Prometheus是一个开源的服务监控系统,它通过HTTP协议从远程的机器收集数据并存储在本地的时序数据库上。本文章介绍如何在Centos7.5下面部署一套监控系统(Prometheus+Node_Exporter+Grafana)。
Quick Guide
安装Prometheus
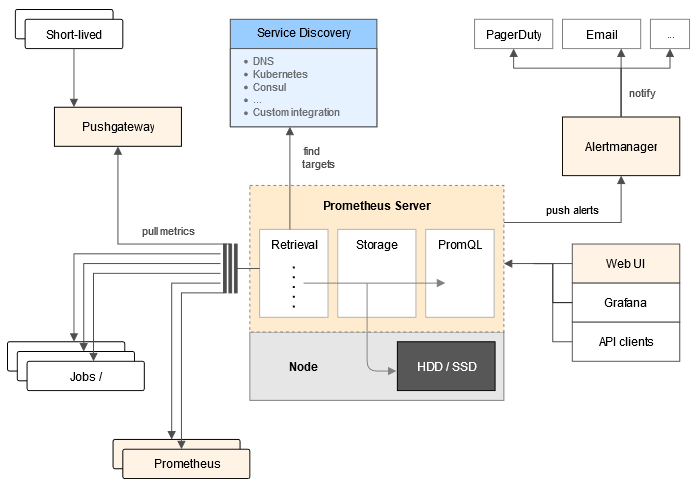
1.下载安装
1
2
3
wget https://github.com/prometheus/prometheus/releases/download/v2.7.1/prometheus-2.7.1.linux-amd64.tar.gz
tar -C /usr/local/ -zxvf prometheus-2.7.1.linux-amd64.tar.gz
cd /usr/local/prometheus-2.7.1.linux-amd64/2.设置用户
1
2
3
4
5
6
7
8
9
10
# 添加用户
groupadd prometheus
useradd -g prometheus -s /sbin/nologin prometheus
# 赋权限
chown -R prometheus:prometheus /usr/local/prometheus-2.7.1.linux-amd64/
# 创建prometheus运行数据目录
mkdir -p /var/lib/prometheus
chown -R prometheus:prometheus /var/lib/prometheus/3.配置systemd成服务,用 systemd 来开机启动
1
2
3
4
5
6
# 创建配置文件
touch /usr/lib/systemd/system/prometheus.service
chown prometheus:prometheus /usr/lib/systemd/system/prometheus.service
# 复制下面内容到配置文件
vim /usr/lib/systemd/system/prometheus.service1
2
3
4
5
6
7
8
9
10
11
12
13
14
15[Unit]
Description=Prometheus
Documentation=https://prometheus.io/
After=network.target
[Service]
# Type设置为notify时,服务会不断重启
Type=simple
User=prometheus
# --storage.tsdb.path是可选项,默认数据目录在运行目录的./dada目录中
ExecStart=/usr/local/prometheus-2.7.1.linux-amd64/prometheus --config.file=/usr/local/prometheus-2.7.1.linux-amd64/prometheus.yml --storage.tsdb.path=/var/lib/prometheus
Restart=on-failure
[Install]
WantedBy=multi-user.target1
2
3# 设置开机启动
systemctl enable prometheus
systemctl start prometheus4.设置iptables
1
2# 新增下面规则
vim /etc/sysconfig/iptables1
2# 规则
-A INPUT -p tcp -m state --state NEW -m tcp --dport 9090 -j ACCEPT1
2# 重启 iptables
service iptables restart5.查看服务状态
1
2
3
4
5# 查看版本
./prometheus --version
# 查看状态
systemctl status prometheus6.使用浏览器访问http://<service_ip:9090>
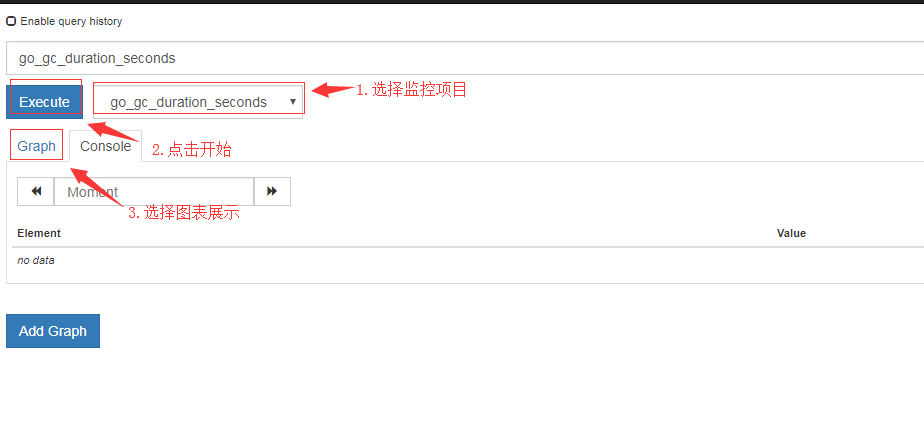
安装Node_Exporter
Prometheus Server并不直接服务监控特定的目标,其主要任务负责数据的收集,存储并且对外提供数据查询支持。因此需要在被监控主机上安装Exporter,Prometheus周期性的从Exporter暴露的HTTP服务地址(通常存放采样数据的地址是/metrics))拉取监控样本数据。
1.部署
1
2
3
4
5
6
7
8# 下载
cd /usr/local/src/
wget https://github.com/prometheus/node_exporter/releases/download/v0.17.0/node_exporter-0.17.0.linux-amd64.tar.gz
# 部署
tar -zxvf node_exporter-0.17.0.linux-amd64.tar.gz -C /usr/local/
cd /usr/local/
mv node_exporter-0.17.0.linux-amd64/ node_exporter/2.新增用户
1
2
3groupadd prometheus
useradd -g prometheus -s /sbin/nologin prometheus
chown -R prometheus:prometheus /usr/local/node_exporter/3.设置开机启动
1
2
# 创建配置文件,把下面配置复制进去
vim /usr/lib/systemd/system/node_exporter.service1
2
3
4
5
6
7
8
9
10
11
12
13[Unit]
Description=node_exporter
Documentation=https://prometheus.io/
After=network.target
[Service]
Type=simple
User=prometheus
ExecStart=/usr/local/node_exporter/node_exporter
Restart=on-failure
[Install]
WantedBy=multi-user.target1
2
3# 设置开机启动
systemctl enable node_exporter
systemctl start node_exporter4.设置iptables
1
2# 新增下面规则
vim /etc/sysconfig/iptables1
2# 规则
-A INPUT -p tcp -m state --state NEW -m tcp --dport 9100 -j ACCEPT1
2# 重启 iptables
service iptables restart5.使用浏览器访问http://<monitor_ip:9100>

配置Prometheus
修改配置
1
2# 新增配置到配置文件
vim /usr/local/prometheus-2.7.1.linux-amd64/prometheus.yml1
2
3
4
5
6
7
8
9
10
11
12
13
14
15
16
17
18
19
20
21
22
23
24
25
26
27
28
29
30
31
32
33
34
35
36
37
38
39
40
41
42
43
44
45
46# 全局配置
global:
scrape_interval: 15s # 设置抓取时间间隔为15s,默认是1m
evaluation_interval: 15s # 设置rules评估时间间隔为15s,默认是1m
# scrape_timeout is set to the global default (10s).
# 告警管理配置
alerting:
alertmanagers:
+ static_configs:
+ targets:
# - alertmanager:9093
# 加载rules,并根据设置的时间间隔定期评估,暂未使用,默认配置
rule_files:
# - "first_rules.yml"
# - "second_rules.yml"
# 抓取(pull),即监控目标配置
# 默认只有主机本身的监控配置
scrape_configs:
# 监控目标的label(这里的监控目标只是一个metric,而不是指某特定主机,可以在特定主机取多个监控目标),在抓取的每条时间序列表中都会添加此label
- job_name: 'prometheus'
# metrics_path defaults to '/metrics'
# scheme defaults to 'http'.
# 新增:可覆盖全局配置设置的抓取间隔,由15秒重写成5秒。
scrape_interval: 5s
# 静态指定监控目标,暂不涉及使用一些服务发现机制发现目标
static_configs:
- targets: ['localhost:9090']
# 以下都为新增:(opentional)再添加一个label,标识了监控目标的主机
labels:
instance: prometheus
- job_name: 'linux'
scrape_interval: 10s
static_configs:
# 采用node_exporter默认开放的端口
- targets: ['10.1.2.3:9100']
labels:
instance: node1
2.重启服务
1
systemctl start prometheus
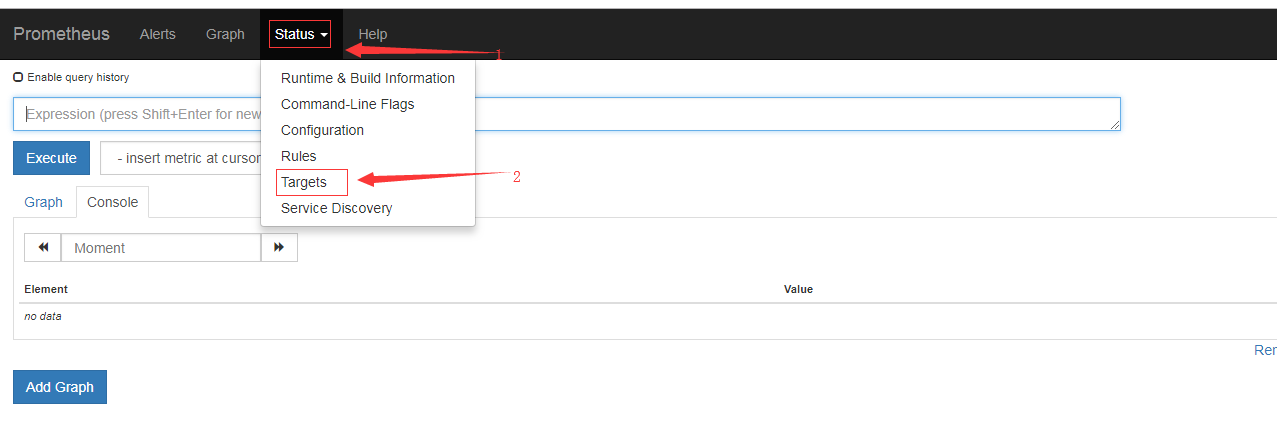
3.使用浏览器访问http://<monitor_ip:9100>,点击status的targets

部署Grafana
为了监控数据展示更好看,我们安装Grafana.它是用于可视化大型测量数据的开源程序,能Dashboard中显示了你不同metric数据源中的数据。
1.部署
1
2
3cd /usr/local/src/
wget https://dl.grafana.com/oss/release/grafana-6.0.0-1.x86_64.rpm
sudo yum localinstall grafana-6.0.0-1.x86_64.rpm2.配置文件
配置文件位于/etc/grafana/grafana.ini,这里暂时保持默认配置即可。3.设置开机启动
1
2systemctl enable grafana-server
systemctl start grafana-server4.设置iptables
1
2
# 新增下面规则
vim /etc/sysconfig/iptables1
2# 规则
-A INPUT -p tcp -m state --state NEW -m tcp --dport 3000 -j ACCEPT1
2# 重启 iptables
service iptables restart5.添加数据源
使用浏览器访问http://<server_ip>:3000,默认账号/密码:admin/admin

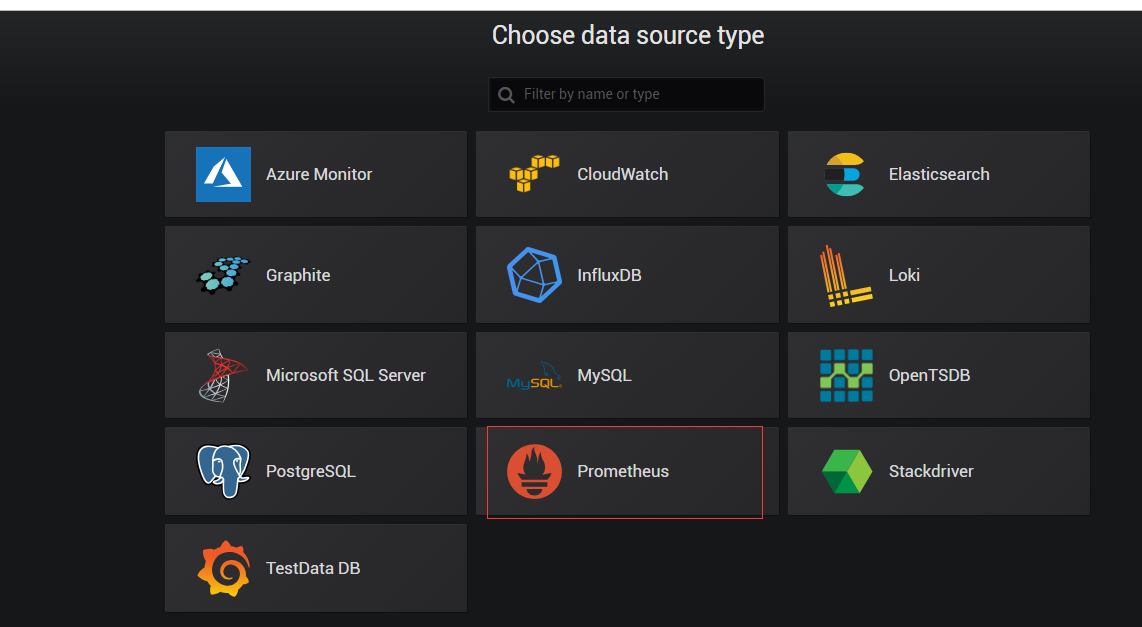
在登陆首页,点击”Add data source”按钮,选择Prometheus,
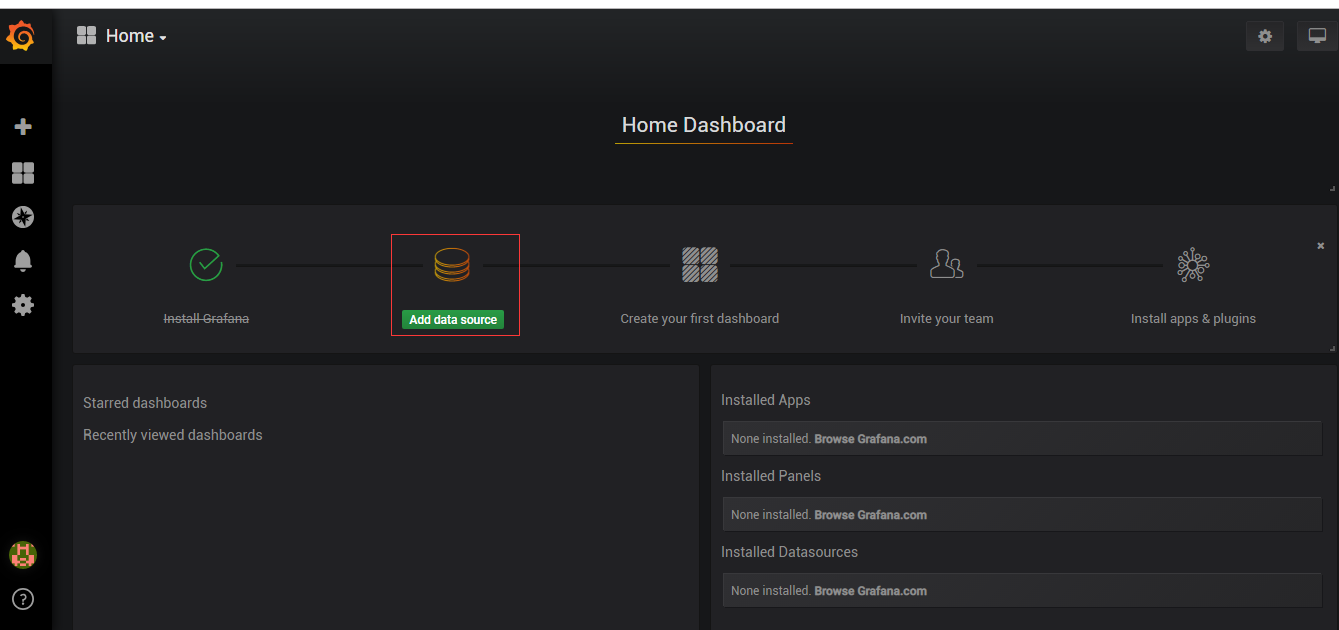
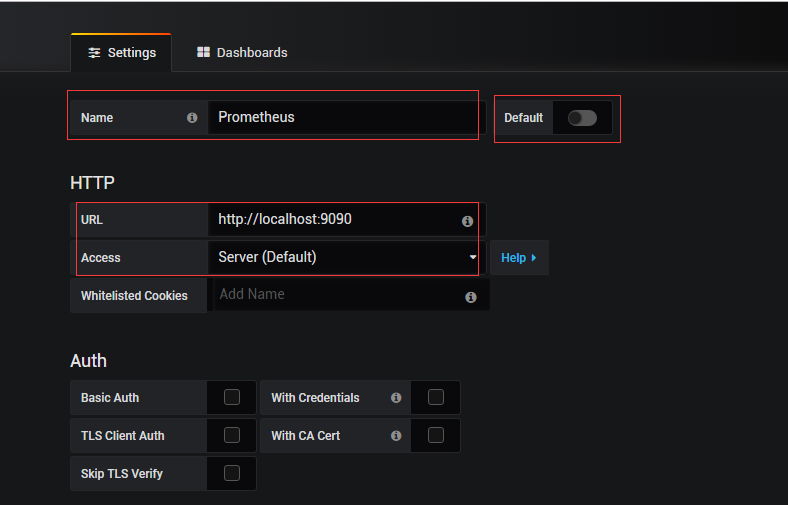
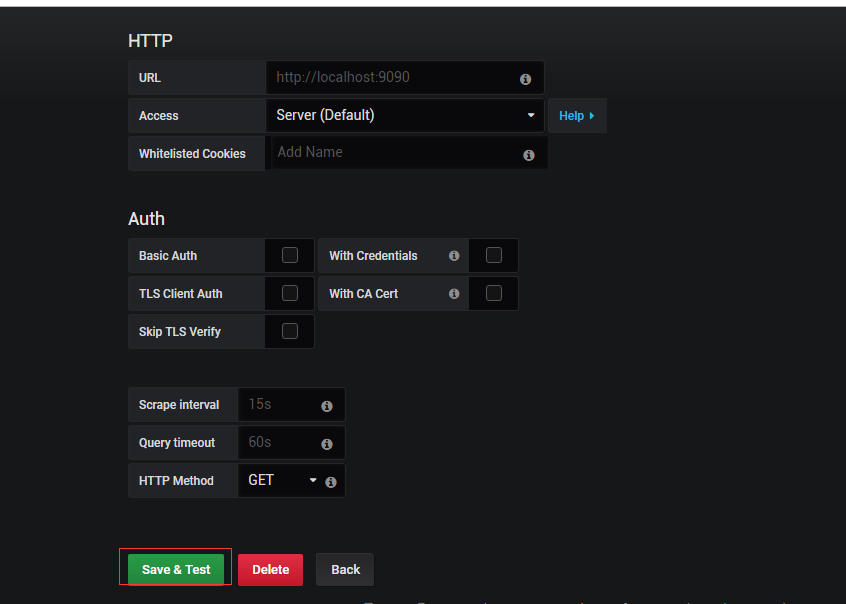
取消Default的勾选,URL选择一下默认配置,其他不变,然后点击Save&Test
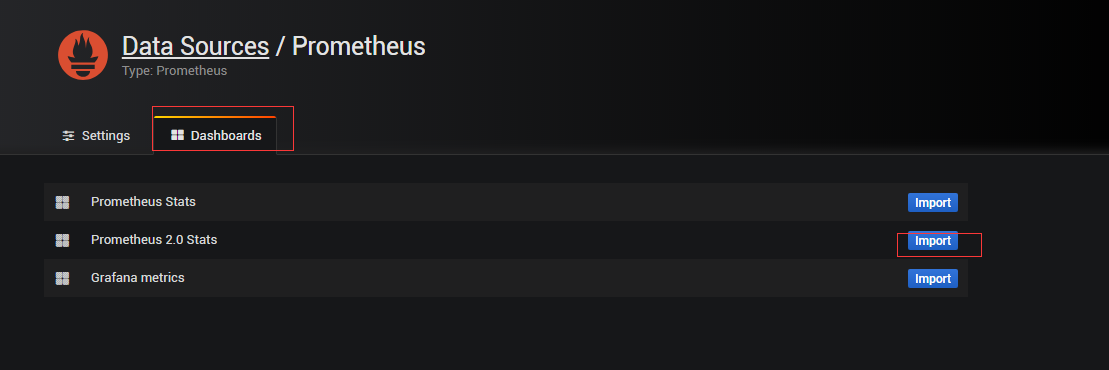
在”Dashboards”页签下”import”自带的模版
6.下载模板导入dashboard(可选)
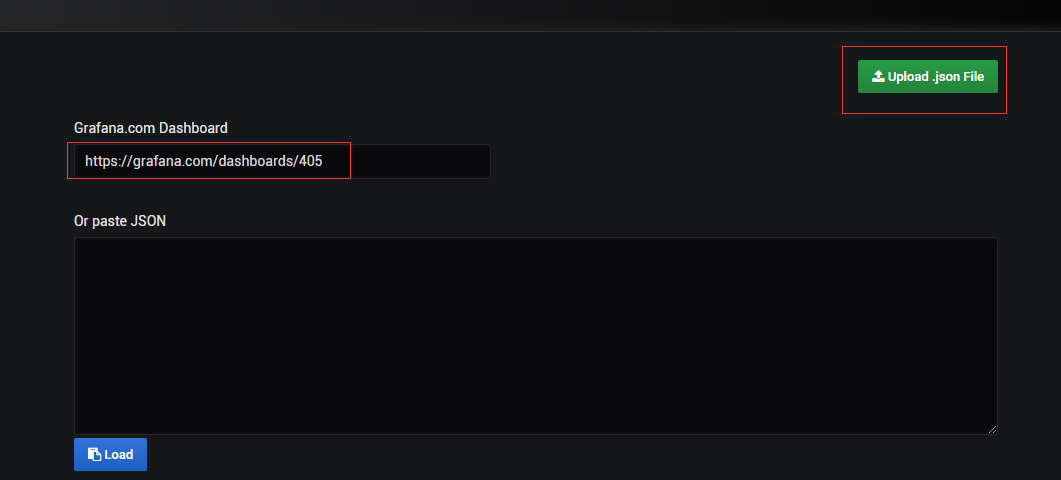
选择左上角图标+–>import

填写url或者id,例如https://grafana.com/dashboards/405,点击Upload会自动下载模板
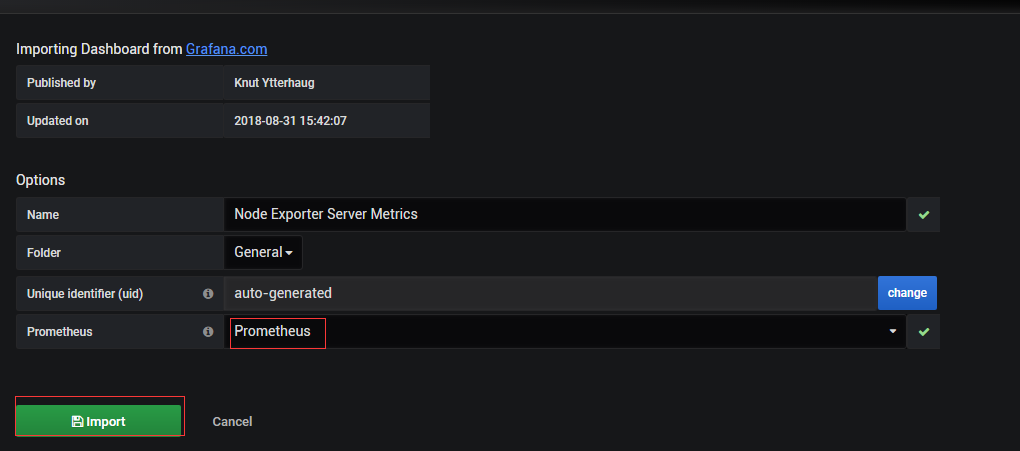
数据源选择”prometheus”,即添加的数据源name,点击”Import”按钮
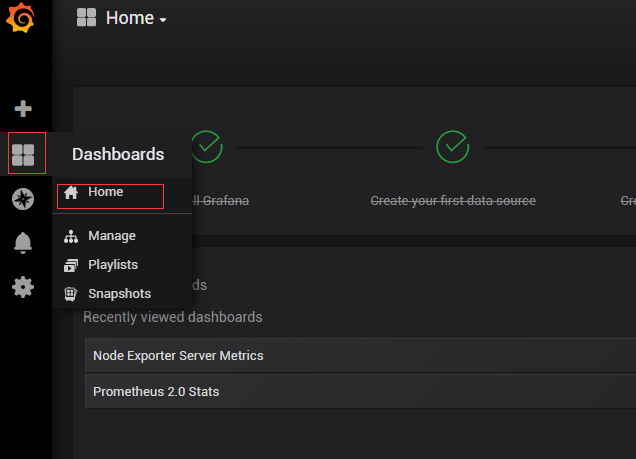
7.查看dashboard
选择Dashboard–>Home
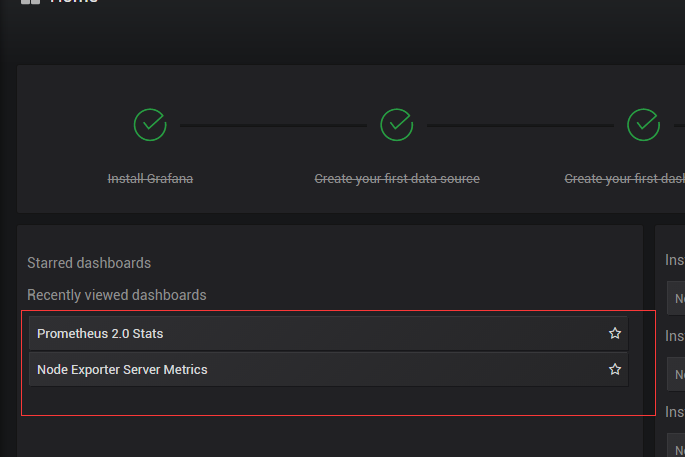
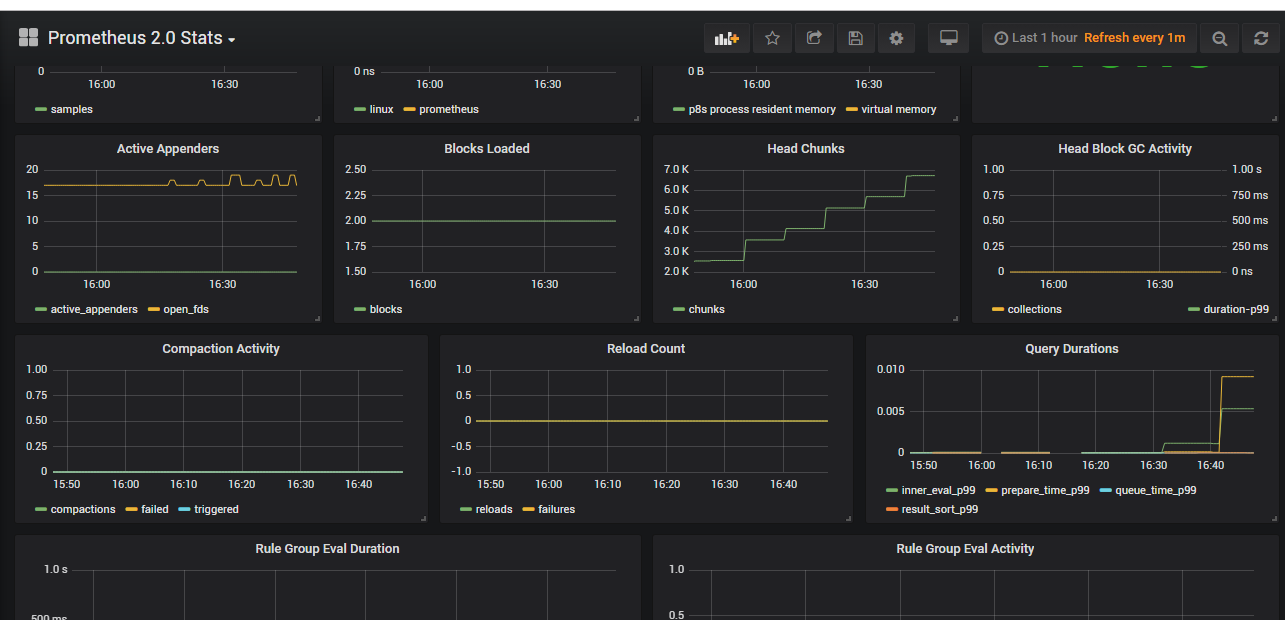
列表中可见有已添加的两个dashboard,选择1个即可,如下:
More info: Grafana Github Prometheus Github