Hue (Hadoop User Experience Hadoop用户体验)是一个开源的 Apache Hadoop UI系统,由Cloudera Desktop演化而来,最后Cloudera公司将其贡献给Apache基金会的Hadoop社区,它是基于Python Web框架Django实现的。通过使用HUE我们可以在浏览器端的Web控制台上与Hadoop集群进行交互,来分析处理数据。
本文章主要介绍 Hue 和 在centos环境下如何安装 。
Quick Guide
一、用途
- 访问HDFS和文件浏览
- 通过web调试和开发hive以及数据结果展示
- 查询solr和结果展示,报表生成
- 通过web调试和开发impala交互式SQL Query
- spark调试和开发
- Pig开发和调试
- oozie任务的开发,监控,和工作流协调调度
- Hbase数据查询和修改,数据展示
- Hive的元数据(metastore)查询
- MapReduce任务进度查看,日志追踪
- 创建和提交MapReduce,Streaming,Java job任务
- Sqoop2的开发和调试
- Zookeeper的浏览和编辑
- 数据库(MySQL,PostGres,SQlite,Oracle)的查询和展示
二、架构
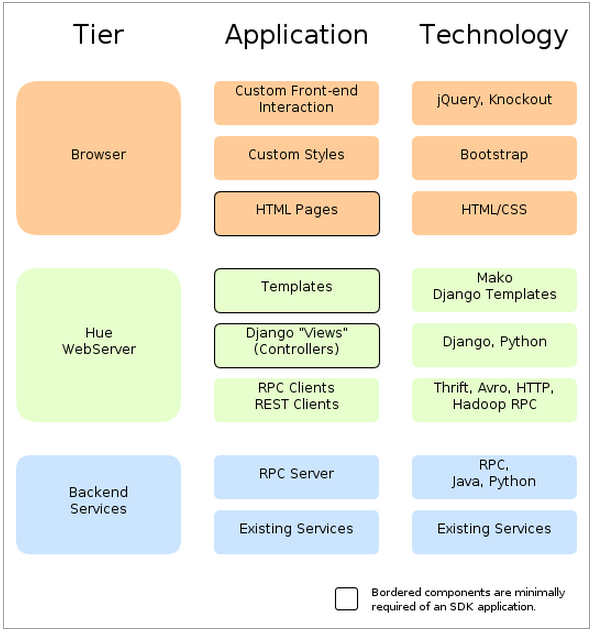
从总体上来讲,Hue应用采用的是B/S架构,该web应用的后台采用python编程语言别写的。大体上可以分为三层,分别是前端view层、Web服务层和Backend服务层。Web服务层和Backend服务层之间使用RPC的方式调用。

三、安装
1.前置
- 1.安装
python和maven - 2.安装
hadoop和hive - 3.创建应用类服务专有用户
1 | useradd -g hadoop hue |
- 4.安装依赖包
1 | yum -y install ant asciidoc cyrus-sasl-devel cyrus-sasl-gssapi gcc gcc-c++ krb5-devel libtidy libxml2-devel libxslt-devel openldap-devel python-devel sqlite-devel openssl-devel mysql-devel gmp-devel |
2.安装
- 2.1.下载安装包(官网或者github)
1 | yum install git -y |
2.2.切换用户 hue
1
2chown -R hue:hadoop hue
su hue2.3.编译
1
2cd hue
make apps2.4.修改
/usr/local/hue/desktop/conf/pseudo-distributed.ini
1 | [desktop] |
3.hue集成hadoop
- 3.1.修改配置文件,增加代理用户hue
1
vi $HADOOP_HOME/etc/hadoop/core-site.xml
新增内容:1
2
3
4
5
6
7
8<property>
<name>hadoop.proxyuser.hue.hosts</name>
<value>*</value>
</property>
<property>
<name>hadoop.proxyuser.hue.groups</name>
<value>*</value>
</property>
- 3.2.配置hue:修改 desktop/conf/pseudo-distributed.ini文件
修改标签 [[hdfs_clusters]] 如下:1
2
3
4
5
6
7
8
9
10
11
12
13
14
15
16
17
18
19
20
21
22
23
24
25
26
27
28
29
30[hadoop]
# Configuration for HDFS NameNode
# ------------------------------------------------------------------------
[[hdfs_clusters]]
# HA support by using HttpFs
[[[default]]]
# Enter the filesystem uri
fs_defaultfs=hdfs://master:54310
# NameNode logical name.
logical_name=master
# Use WebHdfs/HttpFs as the communication mechanism.
# Domain should be the NameNode or HttpFs host.
# Default port is 14000 for HttpFs.
## webhdfs_url=http://localhost:50070/webhdfs/v1
webhdfs_url=http://master:9870/webhdfs/v1
# Change this if your HDFS cluster is Kerberos-secured
## security_enabled=false
# In secure mode (HTTPS), if SSL certificates from YARN Rest APIs
# have to be verified against certificate authority
## ssl_cert_ca_verify=True
# Directory of the Hadoop configuration
## hadoop_conf_dir=$HADOOP_CONF_DIR when set or '/etc/hadoop/conf'
hadoop_conf_dir=$HADOOP_CONF_DIR
修改标签 [[yarn_clusters]] 如下:1
2
3
4
5
6
7
8
9
10
11
12
13
14
15
16
17
18
19
20
21
22
23
24
25
26
27
28
29
30
31
32
33
34
35
36
37
38
39
40
41
42
43# Configuration for YARN (MR2)
# ------------------------------------------------------------------------
[[yarn_clusters]]
[[[default]]]
# Enter the host on which you are running the ResourceManager
## resourcemanager_host=localhost
resourcemanager_host=master
# The port where the ResourceManager IPC listens on
## resourcemanager_port=8032
# Whether to submit jobs to this cluster
submit_to=True
# Resource Manager logical name (required for HA)
## logical_name=
# Change this if your YARN cluster is Kerberos-secured
## security_enabled=false
# URL of the ResourceManager API
## resourcemanager_api_url=http://localhost:8088
resourcemanager_api_url=http://master:8088
# URL of the ProxyServer API
## proxy_api_url=http://localhost:8088
proxy_api_url=http://master:8088
# URL of the HistoryServer API
## history_server_api_url=http://localhost:19888
history_server_api_url=http://master:19888
# URL of the Spark History Server
## spark_history_server_url=http://localhost:18088
spark_history_server_url=http://master:18080
# Change this if your Spark History Server is Kerberos-secured
## spark_history_server_security_enabled=false
# In secure mode (HTTPS), if SSL certificates from YARN Rest APIs
# have to be verified against certificate authority
## ssl_cert_ca_verify=True
4.hue集成hive配置
4.1.拷贝配置
hive-site.xml到目录1
2
3mkdir -p /usr/local/hue/hive/conf
cp /hadoop/install/apache-hive-3.1.2/conf/hive-site.xml /usr/local/hue/hive
/conf/4.2.修改
desktop/conf/pseudo-distributed.ini的标签[beeswax]
1 | [beeswax] |
5.hue集成spark配置
5.1.启动spark的thrift server
1
2cd /hadoop/install/spark/sbin
start-thriftserver.sh --master yarn --deploy-mode client5.2.安装livy
1
2
3
4
5cd /hadoop/software
wget http://livy.incubator.apache.org/download/apache-livy-0.6.0-incubating-bin
.zip
unzip apache-livy-0.6.0-incubating-bin.zip -C
mv apache-livy-0.6.0-incubating-bin /hadoop/install/livy-0.6.05.3.创建livy的
livy-env.sh配置文件和log目录1
2
3cd livy-0.6.0/conf/
cp livy-env.sh.template livy-env.sh
mkdir -p /data/livy/logs5.4.在
livy-env.sh新建配置1
2
3
4export HADOOP_CONF_DIR=/hadoop/install/hadoop/etc/hadoop
export SPARK_HOME=/hadoop/install/spark
export LIVY_LOG_DIR=/data/livy/logs
export LIVY_PID_DIR=/data/livy/pid5.5.配置
livy.conf1
cp livy.conf.template livy.conf
5.6.在
livy.conf文件中加入以下内容1
2
3
4
5
6# What port to start the server on.
livy.server.port = 8998
# What spark master Livy sessions should use.
livy.spark.master = yarn
# What spark deploy mode Livy sessions should use.
livy.spark.deploy-mode = client5.7.启动livy
1
/hadoop/install/livy-0.6.0/bin/livy-server start
5.8.修改
desktop/conf/pseudo-distributed.ini文件的标签[spark]1
2
3
4
5
6
7
8
9
10
11
12
13
14
15
16
17
18
19
20
21
22
23
24
25
26
27
28
29
30
31###########################################################################
# Settings to configure the Spark application.
###########################################################################
[spark]
# The Livy Server URL.
## livy_server_url=http://localhost:8998
livy_server_url=http://master:8998
# Configure Livy to start in local 'process' mode, or 'yarn' workers.
## livy_server_session_kind=yarn
livy_server_session_kind=yarn
# Whether Livy requires client to perform Kerberos authentication.
## security_enabled=false
# Whether Livy requires client to use csrf protection.
## csrf_enabled=false
# Host of the Sql Server
## sql_server_host=localhost
sql_server_host=master
# Port of the Sql Server
## sql_server_port=10000
sql_server_port=10000
# Choose whether Hue should validate certificates received from the server.
## ssl_cert_ca_verify=true
###########################################################################
6.MySql初始化
1.建一个名为hue的库
1
2
3
4
5
6
7
8
9# 登录mysql数据库
mysql -u root -p
# 创建数据库hue
create database hue;
# 创建用户
create user 'hue'@'%' identified by '123456';
# 授权
grant all privileges on hue.* to 'hue'@'%';
flush privileges;2.生成表
1
2build/env/bin/hue syncdb
build/env/bin/hue migrate
7.启动hue
- 启动hue
1
build/env/bin/supervisor &
- 2.验证:访问 http://master:8000